Jupiter API Integration: Custom RPC and Transaction Landing
Build a Jupiter Swap API V2 integration with custom Solana RPC, transaction simulation, priority fees, landing, confirmation, real-time monitoring, and historical swap data.
The Jupiter Swap API V2 decision comes down to who owns execution once a route exists. /order and /execute keep that with Jupiter. /build hands it to the integrator instead — construction, simulation, signing, submission, confirmation, retries, all of it.
An incomplete /build integration usually shows up in predictable ways: a swap stuck between "sent" and "confirmed," a compute budget that overpays on fees or runs out mid-transaction, or a retry that resends the wrong transaction and creates an unintended second trade.
Landing and confirmation issues are easier to debug once that responsibility split is clear.
How Jupiter Swap API V2 Works
Swap API V2 exposes two paths with different execution flows.
| Path | Flow | Who handles execution |
|---|---|---|
| Meta-Aggregator | /order → sign → /execute | Jupiter |
| Router | /build → build/simulate/sign → RPC or tx.jup.ag | Integrator |
Custom Solana infrastructure matters mostly on the Router path, where the application controls transaction construction and submission. If an application only needs the Meta-Aggregator flow, most of what follows is background rather than a requirement.
Meta-Aggregator: /order and /execute
Here, multiple routing engines — Metis, JupiterZ, Dflow, OKX — compete for the order. Jupiter returns an assembled transaction, the user or integrator signs it, and /execute takes over from there: priority-fee strategy, transaction delivery, confirmation polling, retries, and result parsing all happen on Jupiter's side.
This path usually works without a dedicated RPC. For a wallet swap screen or a straightforward backend swap without custom logic attached, it's usually the simpler, more maintainable choice.
Router: /build
/build gives a Metis-routed swap, but instead of one immutable transaction, it returns raw instruction groups, address lookup table mappings, and blockhash metadata. From here, transaction composition, simulation, signing, delivery, confirmation, and retries move to the integrator.
When Should You Use Custom Solana RPC with Jupiter?
/build makes sense once execution requirements move past what /execute already covers: custom instructions before or after the swap, CPI into another program, a compute budget sized by the application rather than accepted as a managed estimate, an independent fee policy, or a deliberate multi-path submission and failover setup.
Latency-sensitive systems fall into the same category — swaps running through an existing Solana trading bot infrastructure pipeline, or through a low-latency RPC stack that already carries the rest of production traffic.
When the application only needs a normal user-initiated swap, /order + /execute remains the simpler default — a custom transaction pipeline adds signing, simulation, retry, confirmation, and monitoring logic that the application then has to operate.
/build always requires some independent RPC functionality, regardless of scale — a way to simulate the finished transaction and a way to check signature status once it's sent — because tx.jup.ag only sends and does neither. The blockhash itself already comes from /build's own response, so no separate RPC call is needed just to fetch one. Whether that RPC needs to be dedicated is a separate question, decided by operational metrics: latency targets, throughput demands, reliability guarantees, and failover design.
When those requirements are real, custom infrastructure becomes part of the integration: RPC for reads and submission, a transaction landing path for delivery, streaming for live monitoring, and storage or indexing for historical analysis.
For integrations that choose /build for this level of control, Supanode provides the surrounding Solana infrastructure — dedicated RPC, transaction landing paths, Yellowstone gRPC streaming, and historical indexing. Standard Jupiter swap integrations can usually stay with /order and /execute.
Build the Swap with Jupiter /build
The endpoint is GET https://api.jup.ag/swap/v2/build, authenticated with an x-api-key header. It currently supports ExactIn only; ExactOut flows need a different endpoint.
Main parameters:
| Parameter | Required | Notes |
|---|---|---|
inputMint / outputMint | Yes | Token mints for the swap |
amount | Yes | Smallest unit, as a string |
taker | Yes | Public key of the swapping wallet |
slippageBps | No | Default 50; also accepts rtse |
maxAccounts | No | 1–64, default 64 — lowering it makes room for custom instructions but trims available routes |
computeUnitPricePercentile | No | medium / high / veryHigh, or a numeric percentile |
wrapAndUnwrapSol | No | Defaults to true; matters when handling native SOL directly |
const useJupiterLanding = true;

const params = new URLSearchParams({
  inputMint: "So11111111111111111111111111111111111111112",
  outputMint: "EPjFWdd5AufqSSqeM2qN1xzybapC8G4wEGGkZwyTDt1v",
  amount: "100000000",
  taker: takerPubkey.toBase58(),
  payer: feePayer.toBase58(),
  slippageBps: "50",
  computeUnitPricePercentile: "high",
});

if (useJupiterLanding) {
  params.set("tipAmount", "1000000"); // 0.001 SOL minimum for tx.jup.ag / Jupiter landing
}

const response = await fetch(
  "https://api.jup.ag/swap/v2/build?" + params.toString(),
  { headers: { "x-api-key": process.env.JUPITER_API_KEY! } },
);

const build = await response.json();
The snippet shows the request shape. Production code should also handle authentication errors, failed responses, and retries around the request itself.
At this point Jupiter has picked a route and generated the instruction set. After this response, the application owns the remaining transaction lifecycle: composing the final transaction, simulating it, signing it, sending it, confirming it, and deciding when to retry or rebuild.
Assemble and Sign the Solana Transaction
The response returns separate instruction groups (setupInstructions, swapInstruction, cleanupInstruction, otherInstructions) instead of a single opaque transaction. Jupiter's own /build example assembles them as compute budget → setup → pre-swap instructions → swap → post-swap instructions → cleanup → otherInstructions. Following that sequence, rather than reordering it for readability, keeps the account-state assumptions the route was built against intact.
function toIx(ix: ApiInstruction) {
  return new TransactionInstruction({
    programId: new PublicKey(ix.programId),
    keys: ix.accounts.map(a => ({
      pubkey: new PublicKey(a.pubkey),
      isSigner: a.isSigner,
      isWritable: a.isWritable,
    })),
    data: Buffer.from(ix.data, "base64"),
  });
}

function toLookupTableAccounts(
  raw: Record<string, string[]> | null | undefined,
): AddressLookupTableAccount[] {
  if (!raw) return [];

  return Object.entries(raw).map(
    ([key, addresses]) =>
      new AddressLookupTableAccount({
        key: new PublicKey(key),
        state: {
          deactivationSlot: BigInt("18446744073709551615"),
          lastExtendedSlot: 0,
          lastExtendedSlotStartIndex: 0,
          addresses: addresses.map(address => new PublicKey(address)),
        },
      }),
  );
}

const lookupTables = toLookupTableAccounts(
  build.addressesByLookupTableAddress,
);

const instructions = [
  ...build.setupInstructions.map(toIx),

  // custom pre-swap instructions go here

  toIx(build.swapInstruction),

  // custom post-swap instructions go here

  ...(build.cleanupInstruction ? [toIx(build.cleanupInstruction)] : []),

  ...build.otherInstructions.map(toIx),

  ...(build.tipInstruction ? [toIx(build.tipInstruction)] : []),
];
Custom instructions can change the account-state assumptions Jupiter used when building the route. That makes instruction order, cleanup behavior, and token-account lifecycle part of the integration logic, not just formatting.
The CU-price instruction is already part of the /build response. The CU limit — and the final signature — come after simulation, once the real compute cost is known.
Simulate the Transaction and Set the Compute Budget
/build returns a compute-unit price instruction but no compute-unit limit. Jupiter can't know how much compute the finished transaction will need, since added instructions change that number. A common approach is to build with a high temporary limit, simulate, then rebuild with a margin over measured usage.
const CU_LIMIT_MAX = 1_400_000;

const simMessage = new TransactionMessage({
  payerKey: feePayer,
  recentBlockhash: bs58.encode(
    Buffer.from(build.blockhashWithMetadata.blockhash),
  ),
  instructions: [
    ComputeBudgetProgram.setComputeUnitLimit({ units: CU_LIMIT_MAX }),
    ...instructions,
  ],
}).compileToV0Message(lookupTables);

const sim = await connection.simulateTransaction(
  new VersionedTransaction(simMessage),
  { sigVerify: false, replaceRecentBlockhash: true },
);

if (sim.value.err) {
  throw new Error(
    `Simulation failed: ${JSON.stringify(sim.value.err)}`,
  );
}

const cuLimit =
  typeof sim.value.unitsConsumed === "number" &&
  sim.value.unitsConsumed > 0
    ? Math.min(
        Math.ceil(sim.value.unitsConsumed * 1.2),
        CU_LIMIT_MAX,
      )
    : CU_LIMIT_MAX;
A flat 1.4M limit can overpay at the same CU price when the transaction consistently uses much less compute. Solana priority fees are calculated from the requested limit, not from actual consumption.
With cuLimit known, the final message can be built and signed:
const finalMessage = new TransactionMessage({
  payerKey: feePayer,
  recentBlockhash: bs58.encode(
    Buffer.from(build.blockhashWithMetadata.blockhash),
  ),
  instructions: [
    ComputeBudgetProgram.setComputeUnitLimit({ units: cuLimit }),
    ...build.computeBudgetInstructions.map(toIx), // Jupiter's CU-price instruction
    ...instructions,
  ],
}).compileToV0Message(lookupTables);

const transaction = new VersionedTransaction(finalMessage);

transaction.sign([takerKeypair, feePayerKeypair]);
Signing happens here, against whatever signer model the application uses — a browser wallet, a backend keypair, a remote signer behind a KMS. The transaction is ready for submission only once every required signature is attached.
Submit the Jupiter Transaction: tx.jup.ag or Your Own RPC?
Jupiter documents two ways to hand off a signed transaction: tx.jup.ag, a send-only, RPC-compatible endpoint, and the /tx/v1/submit REST endpoint. It implements standard sendTransaction, requires a minimum 0.001 SOL Jupiter tip, skips preflight, and doesn't serve blockhash, simulation, or confirmation requests itself. Simulation and confirmation still need a separate RPC; the blockhash for a Router-path swap already comes from /build. If it's used, a Solana RPC API is still handling the rest of the lifecycle.
There are three practical submission paths:
Your own RPC. The application keeps endpoint selection, retry policy, and delivery strategy in its own infrastructure — a natural fit when a low-latency Solana RPC stack already carries the rest of production traffic.
tx.jup.ag. Custom transaction construction stays intact, delivery is handed off. A reasonable choice when build-side control matters more than send-side control.
A specialized relay, such as Jito's Block Engine, for bundle-level delivery when its tip auction mechanics fit the strategy.
Whichever path gets chosen, sendTransaction returns only an acceptance state — the RPC agreed to forward the transaction. Solana's own docs describe it only as that; processing and confirmation are separate, later events. This gap creates a common failure state: the application holds a signature while the actual transaction landing outcome is still unknown.
Priority Fees and Transaction Landing
Keep these variables separate: base transaction fee, compute unit limit, compute unit price, the resulting priority fee, the delivery path chosen, and whether the transaction actually landed.
The priority fee itself is simple arithmetic — requested CU limit × CU price in micro-lamports, converted to lamports. /build supplies the CU-price side of that equation; the CU limit comes from simulation, which is why the two get computed together rather than independently.
Fee and delivery solve separate parts of the landing problem. A correctly priced transaction can still fail to land because the blockhash expired, the route went stale before submission, or the delivery path failed before the transaction reached a leader. When landing rates dip, fee percentile is only one variable to check. Route freshness and blockhash age at send time matter as well.
Confirm the Swap and Handle Failed Transactions
A submitted transaction moves through processed → confirmed → finalized. Track it with getSignatureStatuses, or with connection.confirmTransaction({ signature, blockhash, lastValidBlockHeight }), which ties confirmation to the same blockhash-expiry window used elsewhere in the flow.
Acceptance and landing are two different events, so they should be represented as separate states in the application.
Failure modes to handle deliberately:
| Situation | What's happening | What to do |
|---|---|---|
| Simulation fails | Something in the composed instruction set is invalid before it's even sent | Fix before signing, not after a failed send |
| CU limit too low | Runtime exhausts the requested budget mid-execution | Simulate the full transaction, not just Jupiter's swap instruction |
| Blockhash expires | The signed message is no longer valid for processing | Rebuild and re-sign; leave the old bytes alone |
| Route goes stale / slippage trips | Liquidity moved between build and send | Keep build-to-send time short; rebuild rather than retry indefinitely |
| Sender acknowledges, nothing lands | Acceptance and execution are separate events | Confirm through signature status, not the send response |
| Retry | Old signature may still land after a timeout | Check status before resending or rebuilding |
| Confirmation | Application state should follow the onchain outcome | Update state from getSignatureStatuses, not the HTTP response |
Retry and rebuild produce different transaction states, and mixing them up is what creates duplicate trades. Retrying means resending the identical signed transaction — same signature, same economic intent — and it only makes sense while the blockhash is still valid. Once it expires, or the route has gone stale enough that slippage would reject it anyway, resending stops being useful: the application needs to rebuild the transaction, run it back through simulation, and sign the new version. A sender timeout gets checked against signature status before the application signs a replacement transaction.
Monitor Jupiter Swaps in Real Time
After a swap is sent, the application tracks a small set of states: the signature, its status (processed / confirmed / finalized), the slot it landed in, and any execution error. getSignatureStatuses covers all of that for a single swap or a handful of signatures. The actual input/output amounts realized onchain sit outside that call — a one-off getTransaction lookup, or the same stream/indexer used for monitoring at scale, is what surfaces those.
While getSignatureStatuses handles individual status checks efficiently, streaming becomes useful at scale — monitoring dozens of concurrent signatures, tracking whole wallets, or watching program-level activity, where a poll-per-swap approach stops being practical. Solana data streaming through something like Yellowstone gRPC covers that shift, subscribing to transaction and account updates instead of polling for them one at a time.
Store and Query Historical Jupiter Swap Data
Execution and confirmation paths answer recent transaction-state questions. Fill analysis, PnL, backtesting, and route-performance review need persisted swap records: signature, slot and timestamp, input/output mints and amounts, the actual realized output versus the quoted one, fees paid, final status or error, and the timestamps for submission, confirmation, and finalization.
An internal store fed by the stream above, or a managed historical Solana data service, covers that layer. It often appears after execution is already working, when the product needs questions that recent logs cannot answer.
Production Architecture for a Jupiter Swap Integration
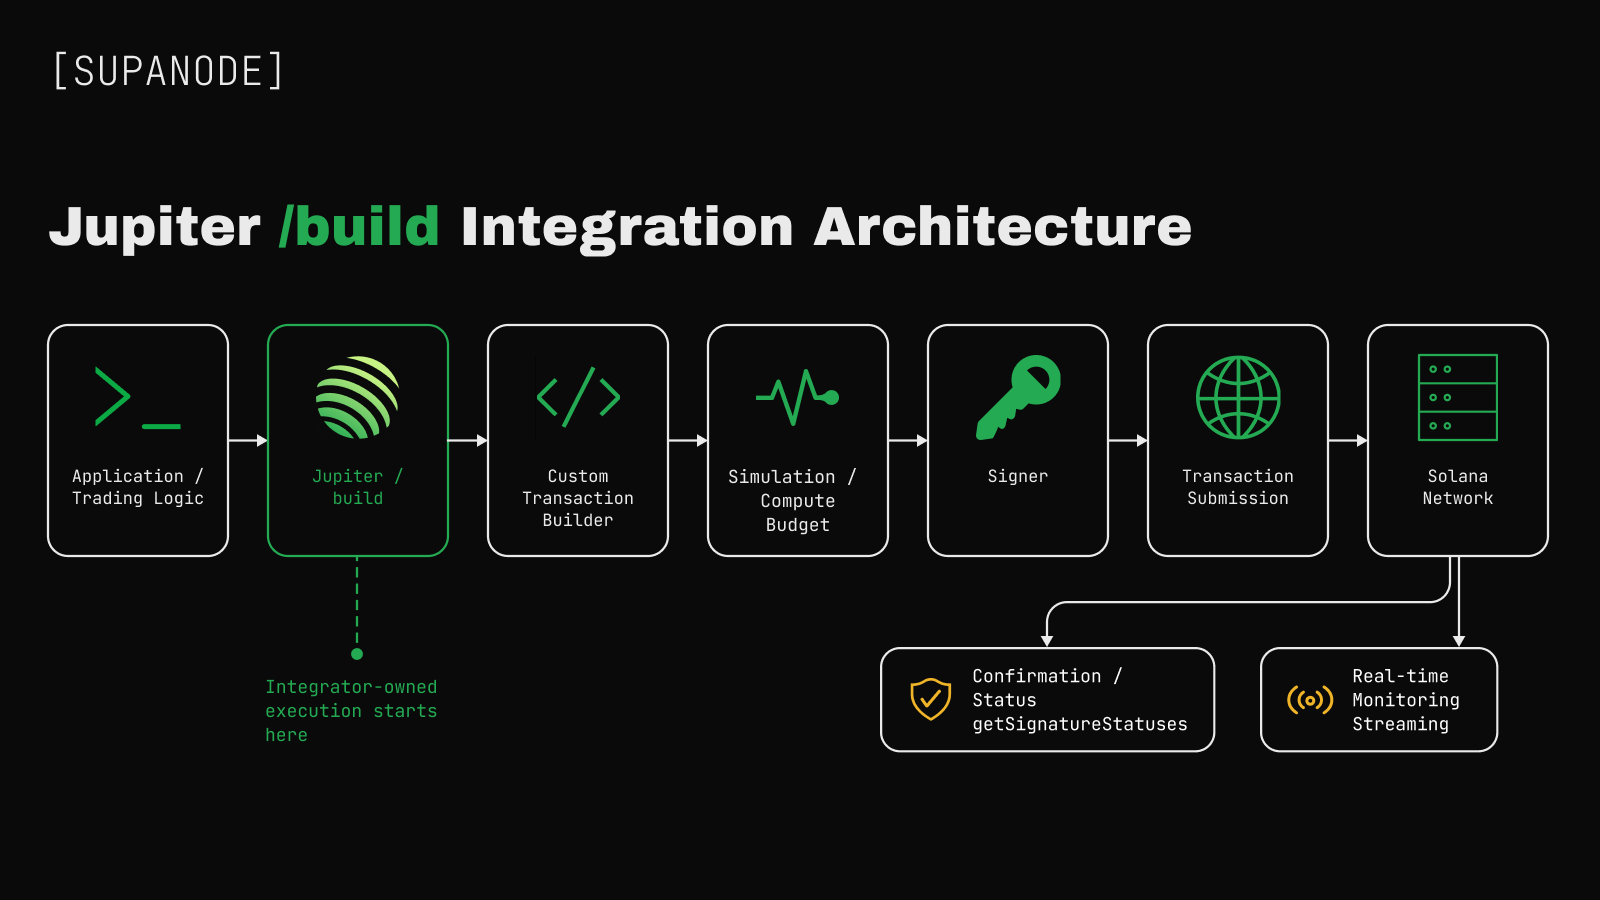
Jupiter returns the route and /build instructions. Everything after that response — construction, simulation, signing, submission, and confirmation — runs in the integrator's transaction pipeline, unless a specific step, such as delivery through tx.jup.ag, is handed to a sender.
Jupiter-Managed vs Custom Execution: Which Architecture Should You Choose?
| Requirement | /order + /execute | /build + custom infrastructure |
|---|---|---|
| Simple swap integration | Best fit | Usually unnecessary |
| Multi-router best-price execution | Yes | No — Metis Router only |
| Managed landing | Yes | Optional, via tx.jup.ag |
| Custom instructions / CPI | No | Yes |
| Custom RPC submission | Not required | Optional — tx.jup.ag or a custom RPC |
| Independent fee policy | Limited | Full control |
| Custom confirmation pipeline | Usually unnecessary | Yes |
| Streaming / historical analytics | Separate layer either way | Separate layer either way |
By default, Jupiter handles routing and execution. Custom Solana infrastructure becomes worth building when a team needs direct control over transaction construction, execution, monitoring, or historical data.